Where To Put Kitchen Backsplash: A Comprehensive Guide
Kitchen backsplashes are more than just decorative elements; they serve a crucial functional purpose by protecting walls from splashes, spills, and grease. Determining the correct placement of kitchen backsplash is a critical design decision that impacts both aesthetics and practicality. This article provides a comprehensive guide to understanding the optimal placement of kitchen backsplashes, considering various factors such as counter height, cabinet configuration, material selection, and design considerations.
The primary function of a kitchen backsplash is to shield the wall area behind the countertops and cooking surfaces from common kitchen messes. Without a backsplash, these areas are susceptible to staining, water damage, and the accumulation of grease and grime. Consistent cleaning of bare walls can be challenging and may eventually damage the paint or wall covering. A well-placed backsplash provides a durable, easy-to-clean surface that preserves the condition of the wall and simplifies kitchen maintenance.
Beyond its functional role, the backsplash presents a significant opportunity to enhance the kitchen's overall aesthetic. It serves as a focal point and allows for the incorporation of colors, textures, and patterns that complement the cabinets, countertops, and flooring. A thoughtfully chosen backsplash can tie together disparate design elements, adding visual interest and creating a cohesive and stylish kitchen environment. The placement of the backsplash is integral to its visual impact, influencing how it interacts with the surrounding elements and contributes to the overall design scheme.
Determining the Standard Backsplash Height
The standard height for a kitchen backsplash is typically 4 inches above the countertop. This height is considered the minimum required to protect the wall from common splashes and spills. This height is particularly common where the backsplash is a simple extension of the countertop material, like granite or quartz. This minimal backsplash offers a clean, streamlined look that is well-suited to contemporary kitchen designs. It is a cost-effective option, as it requires less material and installation time compared to taller backsplashes.
However, a 4-inch backsplash may not provide sufficient protection in all situations. For example, if the kitchen is used for frequent and elaborate cooking, or if the countertops are prone to splashing, a taller backsplash may be necessary. In these cases, a backsplash that extends further up the wall, typically to the bottom of the upper cabinets, offers enhanced protection and visual appeal.
The most common backsplash height extending to the upper cabinets is approximately 18 inches. This height provides ample coverage for the wall area between the countertop and the bottom of the cabinets. It is a practical choice that effectively prevents splashes and spills from reaching the wall, while also allowing for a significant design element to be introduced into the kitchen. The 18-inch height is versatile and suitable for various kitchen styles, from traditional to modern. It provides a balanced look that complements both light and dark cabinets and countertops.
When determining backsplash height, it is important to consider the height of the upper cabinets. Standard upper cabinets are typically installed 18 inches above the countertop, but this height can vary depending on the kitchen design and the homeowner's preferences. Before installing the backsplash, measure the distance between the countertop and the bottom of the upper cabinets to ensure a precise fit. This measurement will ensure that the backsplash extends seamlessly to the bottom of the cabinets, creating a clean and professional finish.
Backsplash Placement Behind the Range
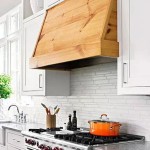
The area behind the range requires special attention when planning the backsplash placement. This area is exposed to high heat, splatter, and grease, making it essential to choose a heat-resistant and easy-to-clean material. In many kitchens, the backsplash behind the range extends to the height of the range hood, creating a focal point that draws the eye and adds visual interest. This full-height backsplash provides maximum protection and incorporates the range hood into the overall design scheme.
If a range hood is not installed, the backsplash behind the range should extend significantly higher than the standard 18 inches to effectively protect the wall from splatters and grease. Many designers recommend extending the backsplash to at least 24-30 inches above the range, or even higher if the cooking surface is prone to heavy splatter. This extended height ensures that the wall is adequately protected, preventing damage and simplifying cleaning.
When selecting a material for the backsplash behind the range, consider factors such as heat resistance, stain resistance, and ease of cleaning. Ceramic and porcelain tiles are excellent choices, as they are durable, heat resistant, and easy to wipe clean. Stainless steel is another popular option, particularly in modern kitchens, as it offers a sleek, industrial look and is highly resistant to heat and corrosion. Glass tiles can also be used, but it is important to choose tempered glass that is designed to withstand high temperatures.
Regardless of the material chosen, ensure that the backsplash behind the range is properly sealed to prevent moisture and grease from penetrating the grout lines. Sealing the grout will make it easier to clean and maintain the backsplash, ensuring that it remains in good condition for years to come. Regular cleaning with a mild detergent and a soft cloth will also help to prevent the buildup of grease and grime.
Considering Specific Kitchen Layouts
The optimal placement of a kitchen backsplash can be impacted by the specific layout of the kitchen. Different kitchen layouts, such as galley kitchens, L-shaped kitchens, and island kitchens, require different backsplash considerations. In a galley kitchen, where countertops line both sides of a narrow space, the backsplash may run continuously along both walls, creating a cohesive and unified look. In an L-shaped kitchen, the backsplash may extend to the end of each countertop run, providing protection and visual interest in the corners of the space.
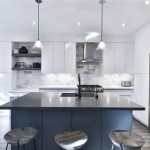
Island kitchens present unique backsplash placement challenges. If the island includes a sink or cooktop, a backsplash is essential to protect the surrounding surfaces from splashes and spills. In many cases, the backsplash on the island will be lower than the backsplash on the perimeter countertops, creating a visual distinction between the two areas. Alternatively, a full-height backsplash can be used on the island to create a dramatic focal point and provide maximum protection.
For kitchens with open shelving instead of upper cabinets, the backsplash can extend higher up the wall, creating a more expansive and impactful design element. This extended backsplash can serve as a backdrop for the open shelves, adding color, texture, and visual interest to the kitchen. When using open shelving, it is important to choose a backsplash material that complements the style and color of the shelves and the items displayed on them.
In kitchens with windows above the countertop, the backsplash may extend to the bottom of the window frame, creating a seamless transition between the countertop and the window. This design approach can enhance the natural light in the kitchen and create a more open and airy feel. When installing a backsplash around a window, it is important to ensure that the edges are properly sealed to prevent moisture from seeping behind the backsplash and damaging the wall.
The placement of electrical outlets and switches should also be considered when planning the backsplash. It is important to ensure that the outlets and switches are easily accessible and that they do not interfere with the design of the backsplash. In some cases, it may be necessary to relocate outlets or switches to accommodate the backsplash design. Consider using decorative switch plates and outlet covers that complement the backsplash material and overall kitchen design.
Ultimately, determining the correct backsplash placement involves a careful balance of functional requirements and aesthetic considerations. Taking into account the standard heights, range placement, and layout-specific challenges will contribute to a well-designed and practical kitchen space. Proper planning and consideration of these factors will ensure that the backsplash serves its intended purpose while enhancing the overall beauty and value of the kitchen.

How To Install A Kitchen Backsplash The Best And Easiest Tutorial

How To Install Tile Backsplash Fixthisbuildthat

Kitchen Backsplashes What Are They Do You Need Them

How To Install Kitchen Tile Backsplash Shades Of Blue Interiors

How To Install A Perfect Tile Backsplash All Materials Tools And Prices Included
.jpg?strip=all "Diy Kitchen Backsplash Installation A Step By Primer")
Diy Kitchen Backsplash Installation A Step By Primer

How To Install A Kitchen Backsplash The Best And Easiest Tutorial

Full Height Backsplashes Pros Cons And Options Stone Central

How To Install A Perfect Tile Backsplash All Materials Tools And Prices Included Youtube

Backsplash Installation From Lowe S