Refacing Kitchen Cabinets: A Before and After Transformation
Kitchen cabinets often represent a significant portion of a kitchen's overall aesthetic and functionality. Over time, cabinets can become worn, outdated, or simply no longer reflect the homeowner's style preferences. A full kitchen remodel, including complete cabinet replacement, can be a costly and disruptive undertaking. Refacing presents a viable alternative, offering a substantial visual upgrade without the need for extensive demolition and reconstruction. This article delves into the process of refacing kitchen cabinets, highlighting the key steps involved and showcasing the dramatic before-and-after transformations achievable through this method.
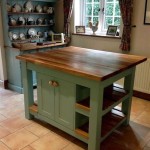
Cabinet refacing primarily involves replacing the existing cabinet doors and drawer fronts with new ones. The existing cabinet boxes, or frames, remain in place, providing a solid foundation for the new components. This approach leverages the existing cabinet structure, minimizing waste and reducing the overall project cost. The process typically includes applying a new veneer to the exposed surfaces of the cabinet boxes to match the new doors and drawer fronts, creating a cohesive and updated appearance.
Before embarking on a cabinet refacing project, it is crucial to assess the condition of the existing cabinets. Refacing is most suitable when the cabinet boxes are structurally sound and level. Issues such as water damage, warping, or significant structural weaknesses may necessitate cabinet replacement instead of refacing. A thorough inspection of the cabinet boxes, hinges, and drawer slides is essential to determine the suitability of refacing.
Assessing the Suitability of Refacing
The preliminary assessment should focus on several key areas. First, the structural integrity of the cabinet boxes must be evaluated. Look for signs of water damage, such as staining, swelling, or decay. Check for any warping or twisting of the cabinet boxes, which can indicate underlying structural issues. Ensure that the cabinets are securely attached to the walls and that there are no signs of loose connections or instability.
Second, examine the condition of the existing hinges and drawer slides. These components are critical for the smooth operation of the cabinets and drawers. If the hinges are loose, squeaky, or damaged, they may need to be replaced or upgraded. Similarly, if the drawer slides are worn, sticky, or broken, they will need to be replaced to ensure that the drawers function properly. While these components are often replaced during the refacing process, assessing their condition helps determine the overall scope of the project.
Third, consider the layout and design of the existing kitchen. Refacing can significantly improve the aesthetic appearance of the kitchen, but it will not change the fundamental layout of the cabinets. If the existing layout is inefficient or does not meet the homeowner's needs, a full kitchen remodel may be a more appropriate solution. However, if the layout is functional and the primary goal is to update the appearance of the cabinets, refacing can be a cost-effective and time-saving option.
Finally, factor in the homeowner's preferences and budget. Refacing offers a wide range of design options, including different door styles, materials, and finishes. It is important to choose options that align with the homeowner's aesthetic preferences and budget. Obtaining quotes from multiple contractors can help to determine the overall cost of the project and ensure that it remains within budget.
The Refacing Process: A Step-by-Step Guide
The cabinet refacing process typically involves several distinct stages, each requiring careful attention to detail. These stages encompass preparation, removal, surface preparation, veneering, and installation of new components.
Preparation: The initial step involves protecting the surrounding areas from dust and debris. This typically includes covering countertops, appliances, and flooring with plastic sheeting or drop cloths. The existing doors, drawer fronts, hinges, and hardware are then removed from the cabinet boxes. It is important to label each door and drawer front to ensure proper reinstallation or disposal.
Surface Preparation: The exposed surfaces of the cabinet boxes, including the frames and sides, are thoroughly cleaned and prepared for veneering. This may involve sanding down any rough spots or imperfections, filling in any holes or cracks, and priming the surfaces to ensure proper adhesion of the veneer. The goal is to create a smooth, clean surface that will accept the veneer and provide a long-lasting bond.
Veneering: The veneer is carefully applied to the exposed surfaces of the cabinet boxes. This can be done using a variety of materials, including wood veneer, laminate, or rigid thermofoil (RTF). The veneer is typically applied using an adhesive and then pressed into place to ensure a secure bond. Any excess veneer is trimmed off, and the edges are carefully sealed to prevent peeling or chipping. The type of veneer chosen will significantly impact the final appearance and durability of the refaced cabinets.
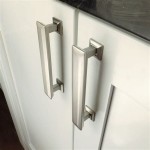
Installation: Once the veneering is complete, the new doors and drawer fronts are installed. This involves attaching the new hinges to the cabinet boxes and then aligning and securing the doors. The drawer fronts are attached to the existing drawers using screws or other fasteners. New hardware, such as knobs and pulls, is then installed to complete the transformation. Proper alignment and adjustment of the doors and drawers are crucial to ensure smooth operation and a professional finish.
Throughout the process, precision and attention to detail are paramount. Incorrect measurements, improper adhesion, or misaligned doors can compromise the final result. Choosing an experienced and reputable contractor is essential to ensure that the refacing project is completed to a high standard.
Before and After: Visualizing the Transformation
The most compelling aspect of cabinet refacing is the dramatic before-and-after transformation it can achieve. Consider a kitchen with outdated, oak cabinets featuring a honey-toned finish. The cabinets are structurally sound but visually tired, contributing to an overall dated aesthetic. The homeowner desires a more modern and sophisticated look without the expense and disruption of a full kitchen remodel.
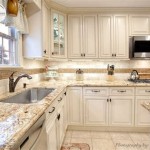
Before: The existing oak cabinets are characterized by their traditional raised-panel doors and visible wood grain. The honey-toned finish is common in older kitchens but lacks the contemporary appeal of more modern finishes. The hardware is also outdated, featuring brass knobs and pulls that detract from the overall aesthetic. The kitchen feels dark and cramped, despite having ample natural light.
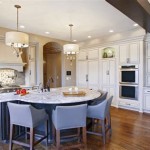
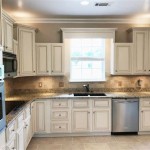
After: Following the refacing process, the kitchen undergoes a remarkable transformation. The oak doors and drawer fronts are replaced with sleek, shaker-style doors finished in a crisp, white paint. The exposed surfaces of the cabinet boxes are veneered with a matching white laminate, creating a seamless and cohesive appearance. New, brushed nickel hardware is installed, adding a touch of modern elegance. The kitchen now feels brighter, more spacious, and significantly more contemporary.
Another example involves cabinets with a worn laminate finish that is peeling and chipping. The cabinet boxes are structurally sound, but the laminate is unsightly and detracts from the overall appearance of the kitchen. The homeowner wants to update the cabinets with a more durable and visually appealing finish.
Before: The existing laminate cabinets are showing signs of wear and tear, with peeling edges and chipped surfaces. The laminate finish is a dated color and style, contributing to an overall unappealing aesthetic. The hardware is also outdated and worn, further detracting from the appearance of the cabinets. The kitchen feels neglected and in need of a refresh.
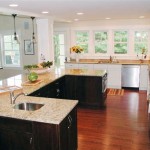
After: After refacing, the cabinets are transformed with new doors and drawer fronts made from solid wood and finished with a durable paint. The exposed surfaces of the cabinet boxes are veneered with a matching wood veneer, creating a seamless and cohesive appearance. New, modern hardware is installed, adding a touch of style and functionality. The kitchen now feels updated, well-maintained, and significantly more inviting. The transformation demonstrates the power of refacing to breathe new life into outdated or worn kitchen cabinets.
These examples illustrate the potential of cabinet refacing to dramatically improve the appearance of a kitchen without the need for a full remodel. The key is to carefully select the appropriate materials, finishes, and hardware to achieve the desired aesthetic. Working with an experienced contractor can ensure that the refacing project is completed to a high standard and that the final result is both beautiful and functional.

Kitchen Cabinet Refacing Makeover A Homeowner S Experience

A Closer Look At Cabinet Refacing And Refinishing Kitchens Redefined

Amazing Kitchen Refacing Transformations

Kitchen Cabinet Refacing By Improveit

Cabinet Refacing Products

Kitchen Cabinet Refacing Pros Cons Quick Guide Houmse

Amazing Kitchen Refacing Transformations

Mind Blowing Kitchen Cabinet Refacing Before And After Results In Just 3 Days

Before After Kitchen Refacing Remodel

Before After A Stunning Midcentury Modern Kitchen Cabinet Refacing Transformation Better Than New Kitchens