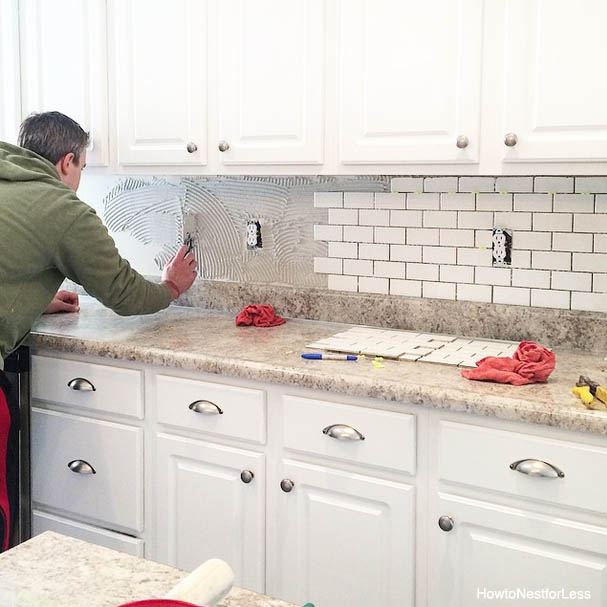
How to Install Backsplash Tile in the Kitchen
Installing a backsplash in your kitchen is a popular DIY project that can significantly enhance the aesthetic appeal and functionality of your workspace. It protects the wall from splatters and spills while adding a touch of elegance and personality to your kitchen. This guide will walk you through the process of installing a backsplash tile, equipping you with the necessary knowledge and steps to achieve a professional-looking finish.
1. Planning and Preparation: Laying the Foundation for Success
Before embarking on the installation process, meticulous planning and preparation are paramount. This step ensures a smooth and successful outcome. Here's a breakdown of essential tasks:
A. Measure and Design: Begin by measuring the backsplash area meticulously. Determine the tile size and quantity required, considering any existing appliances or fixtures. Sketch a layout plan, visualizing the tile arrangement and any patterns or accents.
B. Gather Supplies: Assemble all necessary materials, including tile, mortar, thinset, grout, spacers, a trowel, a wet saw, a level, a tape measure, a sponge, and safety gear. For cutting tile, a wet saw is recommended for achieving precise cuts.
C. Prepare the Wall: Ensure the wall is clean, dry, and free from loose paint or debris. Use a scraper or sandpaper to remove any imperfections. If necessary, apply a moisture-resistant primer for added protection.
2. Installing the Backsplash Tile: Precision and Patience
This step involves carefully applying the tile to the prepared wall, ensuring a secure and visually appealing installation. Follow these detailed instructions:
A. Start at a Corner: Begin with a corner of the backsplash area. Apply a thin layer of thinset to the wall using a notched trowel, creating ridges. This helps to create a strong bond and allows for proper spacing between tiles.
B. Position and Secure the Tile: Place the tile firmly on the thinset, ensuring it is level and aligned with surrounding tiles. Use spacers to maintain uniform gaps between tiles. Gently press the tile into the thinset, ensuring a secure bond.
C. Continue with Remaining Tiles: Repeat steps A and B for each subsequent tile, maintaining a consistent level and alignment. For corners, it may be necessary to cut tiles using a wet saw. Mark tile cuts on the underside using a marker or pencil.
D. Allow for Drying: After placing all tiles, allow the thinset to dry fully according to the manufacturer's instructions. This ensures a robust and durable backsplash installation.
3. Grouting and Finishing Touches: Sealing the Deal
The final step involves filling the gaps between tiles with grout, adding a polished and aesthetically pleasing finish to the backsplash. Here's how to proceed:
A. Prepare the Grout: Mix the grout according to the manufacturer's instructions, achieving a smooth and workable consistency. Ensure the grout is thoroughly mixed to avoid lumps.
B. Apply the Grout: Using a rubber grout float, apply the grout to the gaps between tiles, filling them completely. Press the grout firmly to ensure proper adhesion and avoid leaving empty spaces.
C. Clean Excess Grout: Once the grout has set slightly, use a damp sponge to remove excess grout from the tile surface. Avoid excessive pressure that might dislodge the grout.
D. Allow Grout to Dry: Let the grout cure completely according to the manufacturer's recommendations. This allows the grout to harden and achieve its full strength.
E. Seal for Protection: After the grout has dried, apply a sealant to the backsplash to protect it from stains and moisture. This step will enhance its durability and prolong its lifespan.
Installing a backsplash tile in your kitchen can be a rewarding DIY project that adds both aesthetic appeal and functionality to your space. With careful planning, meticulous attention to detail, and these step-by-step instructions, you can achieve a professional-looking result that enhances your kitchen's charm and functionality. Remember to always prioritize safety, use appropriate protective gear, and consult with a professional if you encounter challenges or doubts.

How To Install A Kitchen Backsplash The Best And Easiest Tutorial

How To Install A Perfect Tile Backsplash All Materials Tools And Prices Included

How To Install A Kitchen Backsplash The Best And Easiest Tutorial

How To Install A Tile Backsplash Arizona

How To Install A Tile Backsplash Part 1 Buildipedia Diy

How To Install A Perfect Tile Backsplash All Materials Tools And Prices Included Youtube

How To Install Tile Backsplash Fixthisbuildthat

How To Install A Tile Backsplash The Home Youtube

How To Install Subway Tile Installing Backsplash For The First Time Crafted Workshop

Backsplash Installation From Lowe S


