How To Do A Tile Backsplash In Kitchen
Installing a tile backsplash is a popular home improvement project that can significantly enhance the aesthetic appeal and functionality of a kitchen. A backsplash protects the wall from water, grease, and food splatters, while also providing an opportunity to add a decorative element to the space. This article provides a comprehensive guide on how to install a tile backsplash, covering everything from preparation to finishing touches.
Planning and Preparation: Gathering Materials and Measuring the Space
Before beginning any installation, meticulous planning is essential. This involves accurately measuring the backsplash area, choosing the appropriate tile, and gathering all necessary tools and materials. The success of the project largely depends on this initial phase.
First, measure the length and height of the area where the backsplash will be installed. Multiply these measurements to determine the total square footage. Add at least 10-15% to this figure to account for cuts and potential breakage. This extra allowance ensures that an adequate supply of tile is available throughout the project.
Next, consider the type of tile to be used. Common choices include ceramic, porcelain, glass, and natural stone. Each material has its own advantages and disadvantages in terms of cost, durability, and maintenance. Ceramic tile is a cost-effective and versatile option, while porcelain is more durable and water-resistant. Glass tile offers a sleek, modern look but can be more challenging to install. Natural stone provides a unique, high-end aesthetic but requires regular sealing.
Once the tile is selected, gather the necessary tools and materials. These typically include:
*Tile:
*Tile adhesive (mortar): Choose a mortar that is appropriate for the type of tile being used and the substrate to which it will be applied.
*Grout: Select a grout color that complements the tile. Epoxy grout is more resistant to stains and water damage than cement-based grout.
*Grout sealer (if using cement-based grout):
*Tile spacers:
*Notched trowel: The size of the notches should be appropriate for the size of the tile.
*Tile cutter or wet saw: A tile cutter is suitable for straight cuts, while a wet saw is necessary for more complex cuts and harder materials.
*Grout float:
*Grout sponge:
*Buckets:
*Measuring tape:
*Level:
*Pencil or marker:
*Safety glasses:
*Gloves:
*Drop cloth or plastic sheeting:
*Painter’s tape:
*Utility knife:
*Caulk:
*Caulk gun:
*Clean rags:
Finally, prepare the work area. Clear the countertops and remove any items that could be damaged by dust or debris. Cover the countertops and floor with drop cloths or plastic sheeting to protect them from mortar and grout. Turn off the power to any outlets or switches in the backsplash area and remove the cover plates. Clean the wall thoroughly to remove any grease, dirt, or loose paint. If the wall surface is glossy or uneven, sanding or the application of a bonding agent may be necessary to ensure proper adhesion of the tile.
Tile Installation: Applying Mortar and Setting Tiles
With the preparation complete, the tile installation can begin. This process involves applying mortar to the wall, setting the tiles, and ensuring proper alignment and spacing.
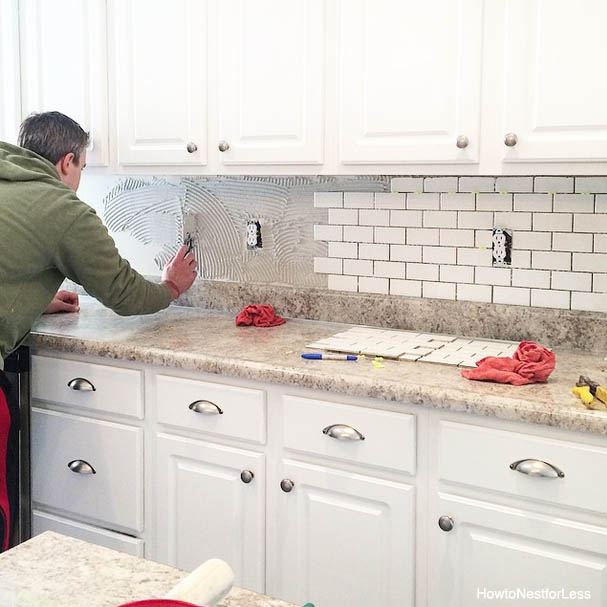
Start by mixing the mortar according to the manufacturer’s instructions. Use a notched trowel to apply a thin, even layer of mortar to a small section of the wall, typically no more than 2-3 square feet at a time. Hold the trowel at a 45-degree angle to create ridges in the mortar. The size of the notches should be appropriate for the size of the tile; larger tiles require larger notches.
Immediately after applying the mortar, begin setting the tiles. Press each tile firmly into the mortar, giving it a slight twist to ensure good contact. Use tile spacers to maintain consistent spacing between the tiles. This is crucial for achieving a professional-looking finish and ensuring that the grout lines are uniform.
Use a level to check the alignment of the tiles as they are being installed. Make adjustments as necessary to ensure that the tiles are straight and plumb. If any tiles are uneven, gently tap them into place with a rubber mallet.
When cutting tiles to fit around outlets, windows, or corners, use a tile cutter or wet saw. Mark the cut lines on the tile with a pencil or marker, and then carefully cut along the lines. Wear safety glasses when using a tile cutter or wet saw to protect the eyes from flying debris.
Continue applying mortar and setting tiles until the entire backsplash area is covered. Allow the mortar to dry completely, typically for 24-48 hours, before proceeding to the next step.
After the mortar has dried, remove the tile spacers. Inspect the tile installation and make any necessary adjustments. If any tiles are loose or uneven, carefully remove them and re-install them with fresh mortar.
Scrape away any excess dried mortar from the tile surfaces and grout lines. A utility knife or a grout removal tool can be used for this purpose. Be careful not to scratch the tile surfaces.
Grouting and Finishing: Applying Grout, Sealing, and Caulking
Once the mortar has completely dried and the tile installation is inspected, the grouting and finishing process can begin. This involves applying grout to fill the spaces between the tiles, cleaning the tile surfaces, and sealing the grout to protect it from stains and water damage.
Mix the grout according to the manufacturer’s instructions. The consistency of the grout should be similar to that of peanut butter; it should be thick enough to hold its shape but still be spreadable.
Apply the grout to the tile surfaces using a grout float. Hold the float at a 45-degree angle and spread the grout diagonally across the tile surfaces, forcing it into the grout lines. Work in small sections, typically no more than 2-3 square feet at a time.
After applying the grout, remove the excess grout from the tile surfaces with a damp grout sponge. Rinse the sponge frequently in a bucket of clean water. Be careful not to remove too much grout from the grout lines.
Allow the grout to dry slightly, typically for 15-30 minutes, and then use a clean, damp sponge to smooth the grout lines. This will give the grout lines a uniform appearance and make them easier to clean.
Allow the grout to cure completely, typically for 24-72 hours, before sealing it. The curing time will vary depending on the type of grout used and the humidity level.
If using cement-based grout, apply a grout sealer to protect it from stains and water damage. Use a brush or applicator to apply the sealer to the grout lines, following the manufacturer’s instructions. Allow the sealer to dry completely before using the backsplash.
Finally, caulk the joints between the tile backsplash and the countertop or wall. This will create a watertight seal and prevent water from seeping behind the tile. Apply a bead of caulk along the joints using a caulk gun, and then smooth the caulk with a wet finger or a caulk smoothing tool. Remove any excess caulk with a damp rag.
Reinstall any outlet or switch cover plates that were removed earlier. Clean the tile surfaces with a tile cleaner to remove any remaining grout haze or residue.
Care and maintenance will help keep a tile backsplash looking its best for years to come. Regularly wipe down the surface with a damp cloth or sponge to remove any spills or splatters. For stubborn stains, use a mild detergent or tile cleaner.
Avoid using abrasive cleaners or scouring pads, as these can scratch the tile surfaces or damage the grout. Inspect the grout lines periodically and reseal them as needed to maintain their water resistance. By following these tips, a tile backsplash will remain a beautiful and functional feature of the kitchen for many years.

How To Install A Kitchen Backsplash The Best And Easiest Tutorial

How To Install A Perfect Tile Backsplash All Materials Tools And Prices Included Youtube

7 Diy Kitchen Backsplash Ideas That Are Easy And Inexpensive Epicurious

How To Install A Perfect Tile Backsplash All Materials Tools And Prices Included

How To Install A Kitchen Backsplash The Best And Easiest Tutorial

How To Install A Tile Backsplash Part 1 Buildipedia Diy

How To Install Kitchen Tile Backsplash Shades Of Blue Interiors

How To Install A Tile Backsplash The Home

13 Ways To Make A Subway Kitchen Backsplash Feel Fresh

How To Install Tile Backsplash Fixthisbuildthat


