Crown Molding Ideas For Kitchen Cabinets
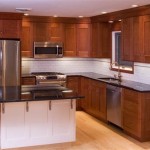
Crown molding is a decorative trim that is installed at the junction where the top of a kitchen cabinet meets the ceiling or wall. This architectural detail elevates the appearance of kitchen cabinetry, adding a touch of elegance, sophistication, and a custom-built aesthetic. The selection of crown molding styles, materials, and installation methods can profoundly impact the overall design and feel of a kitchen.
Beyond aesthetics, crown molding can also serve practical purposes. It can conceal gaps or imperfections between the cabinets and the ceiling, providing a seamless and polished look. In kitchens with soffits, carefully chosen crown molding can integrate the soffit into the overall design, making it appear intentional rather than an awkward architectural necessity. This detail can be particularly important in older homes where soffits are common.
The decision to incorporate crown molding into kitchen cabinets should be carefully considered during the design phase. There are numerous factors to evaluate, including the kitchen's style, the height of the ceiling, the size of the cabinets, and the budget. A well-chosen crown molding design can significantly enhance the perceived value and visual appeal of a kitchen.
Selecting the Right Crown Molding Style
Crown molding is available in a wide variety of styles, ranging from simple and understated to ornate and elaborate. The style chosen should complement the overall design aesthetic of the kitchen. Traditional kitchens often benefit from more intricate crown molding profiles, while contemporary kitchens typically look best with simpler, cleaner lines. Some common crown molding styles include:
Classic Crown Molding: This style features a curved or stepped profile, often with intricate details such as dentil molding or rope detailing. Classic crown molding is well-suited for traditional or transitional kitchens.
Simple Cove Molding: A concave-shaped molding that provides a subtle and elegant transition between the cabinets and the ceiling. Cove molding is a versatile option that can work well in a variety of kitchen styles.
Stepped Crown Molding: This type of molding features a series of stacked profiles, creating a more dramatic and layered look. Stepped crown molding is a good choice for kitchens with high ceilings.
Modern Crown Molding: Characterized by clean lines, geometric shapes, and a minimalist aesthetic. Modern crown molding is ideal for contemporary kitchens.
When selecting a crown molding style, it is crucial to consider the proportions of the kitchen. A large, ornate crown molding can overwhelm a small kitchen with low ceilings, while a small, simple crown molding may get lost in a large kitchen with high ceilings. It is advisable to obtain samples of different crown molding styles and hold them up to the cabinets to visualize how they will look in the space.
Choosing the Appropriate Material
Crown molding is typically made from wood, MDF (Medium-Density Fiberboard), or polyurethane. Each material has its own advantages and disadvantages in terms of cost, durability, ease of installation, and aesthetic properties. Understanding the characteristics of each material is essential for making an informed decision.
Wood Crown Molding: Wood is a classic and versatile material that offers a natural look and feel. It can be stained or painted to match or complement the cabinets. Wood crown molding is typically more expensive than MDF or polyurethane, and it is also more susceptible to moisture damage, making it less suitable for kitchens with high humidity levels. Common wood species used for crown molding include pine, poplar, oak, and maple.
MDF Crown Molding: MDF is a composite material made from wood fibers bonded together with resin. It is less expensive than wood and is more resistant to warping and cracking. MDF crown molding is typically primed and ready to be painted. However, it is not as durable as wood and is more susceptible to water damage. It is important to choose a paint specifically designed for MDF to ensure proper adhesion and a long-lasting finish.
Polyurethane Crown Molding: Polyurethane is a synthetic material that is lightweight, durable, and water-resistant. It is an excellent choice for kitchens with high humidity levels, as it will not warp, rot, or crack. Polyurethane crown molding is available in a variety of styles and can be painted or stained. It is generally more expensive than MDF but less expensive than wood. Polyurethane is often easier to install than wood or MDF, as it can be cut with a saw and fastened with construction adhesive or nails.
The selection of the appropriate material should be based on a balance of cost, aesthetic preferences, and the environmental conditions in the kitchen. Consider the level of humidity in the kitchen, the desired level of durability, and the budget when making this decision.
Installation Techniques and Considerations
Proper installation is crucial for achieving a professional and aesthetically pleasing result with crown molding. Whether opting for DIY installation or hiring a professional, understanding the basic techniques and considerations is vital. The installation process typically involves measuring, cutting, and attaching the crown molding to the cabinets.
Measuring and Cutting: Accurate measurements are essential for ensuring that the crown molding fits properly. Use a measuring tape to determine the length of each run of crown molding, taking into account any corners or angles. Use a miter saw to cut the crown molding at the appropriate angles. For inside corners, use a coping saw to create a precise fit. It is generally best to cut pieces slightly longer than needed and then trim them down to the exact size.
Attaching the Crown Molding: Crown molding can be attached to the cabinets using construction adhesive, nails, or screws. Construction adhesive is a good option for providing a strong and permanent bond. Use a nail gun to drive nails into the cabinets at regular intervals along the length of the crown molding. For added security, use screws to attach the crown molding to the cabinet framing. Be sure to countersink the screws and fill the holes with wood filler before painting or staining.
Dealing with Miters and Joints: Mitering corners accurately is one of the most challenging aspects of installing crown molding. Use a miter saw with a sharp blade to ensure clean and precise cuts. For inside corners, use a coping saw to create a tight and seamless fit. Fill any gaps or imperfections with wood filler and sand smooth before painting or staining. For long runs of crown molding, use scarf joints to join the pieces together. Scarf joints are angled cuts that allow the pieces to overlap, creating a stronger and less noticeable joint.
Finishing Touches: Once the crown molding is installed, it is important to finish it properly. Fill any nail holes or screw holes with wood filler and sand smooth. Prime the crown molding with a high-quality primer and then paint or stain it to match or complement the cabinets. Apply multiple coats of paint or stain for a durable and professional finish. Caulk any gaps between the crown molding and the ceiling or wall to create a seamless and polished look.
Before beginning the installation process, it is advisable to practice cutting and installing crown molding on scrap pieces of wood. This will help to develop the necessary skills and techniques and minimize mistakes. If unsure about any aspect of the installation process, it is best to consult with a professional contractor.
Beyond the basic installation, consider these additional points:
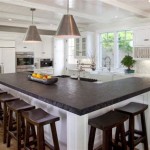
*Consider Lighting Integration:
Some homeowners opt to integrate LED strip lighting behind the crown molding to create a soft, ambient glow. This can add a touch of elegance and sophistication to the kitchen. *Cabinet Height Variations:
If the kitchen cabinets are of varying heights, careful planning is needed to ensure that the crown molding flows seamlessly from one section to another. This may involve using different sizes or styles of crown molding in different areas of the kitchen. *Soffit Integration (Existing):
When integrating the crown molding with an existing soffit, ensure the molding chosen has a depth suitable to cover any unevenness or gaps between the cabinet tops and the soffit's bottom edge. Use shims if necessary and caulk to blend the connection point between the crown molding and the soffit. *Budget Allocation:
Crown molding, depending on the material and details, can significantly impact the overall kitchen renovation budget. Allocate a reasonable amount to ensure good quality material and, if necessary, professional installation for the best result.By carefully considering these factors and planning the installation process properly, it is possible to achieve a beautiful and professional-looking result that will enhance the appearance of the kitchen for years to come.

11 Kitchen Cabinet Crown Molding Ideas For Your

3 Ways To Enhance Your Kitchen With Crown Molding

68 Crown Molding Ideas And Designs For Any Room In 2024 Traditional White Kitchen Cabinets Clean Interior Design Home Decor

3 Ways To Enhance Your Kitchen With Crown Molding

Crown Molding Ideas 10 Ways To Reinvent Any Room Bob Vila

Kitchen Design Details Learn About Crown Molding On Cabinetry

Faq Crown Molding For Cabinets Dura Supreme Cabinetry

11 Kitchen Cabinet Crown Molding Ideas For Your

Crown Molding For Shaker Kitchen Cabinets

20 Crown Molding Ideas Hgtv