Building Plans For Kitchen Island: A Comprehensive Guide
The kitchen island has become a ubiquitous feature in modern kitchens, providing additional counter space, storage, and often serving as a focal point for gathering and dining. Building a kitchen island, rather than purchasing a pre-fabricated model, offers a high degree of customization and allows for tailored solutions that perfectly suit the specific needs and spatial constraints of a kitchen. Constructing a functional and aesthetically pleasing kitchen island, however, requires meticulous planning and a thorough understanding of building principles and practices. This article provides a comprehensive overview of the essential building plans involved in designing and constructing a kitchen island.
Before embarking on the construction process, it is crucial to assess existing kitchen conditions. This assessment should include precise measurements of the available space, noting the location of existing plumbing, electrical outlets, and ventilation systems. These factors significantly influence the design and placement of the island. Furthermore, consider the intended use of the island. Will it primarily serve as a preparation area, a dining space, or a combination of both? The answer to this question will dictate the required countertop space, storage options, and the potential need for integrated appliances like a sink, cooktop, or microwave.
Budgetary considerations are also a critical component of the planning phase. The cost of materials can vary widely depending on the chosen wood type, countertop material, and hardware selections. Obtain quotes from various suppliers to establish a realistic budget and avoid unexpected financial burdens during the construction process. Remember to factor in the cost of tools, fasteners, and any professional services, such as electrical or plumbing work, that may be required.
Key Point 1: Conceptualizing the Island Design and Layout
The design phase involves translating the desired functionality and aesthetic preferences into a detailed plan. Begin by sketching out different island configurations, considering both size and shape. Common island shapes include rectangular, square, L-shaped, and even circular designs. The shape should complement the overall kitchen layout and facilitate efficient workflow.
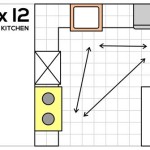
Next, determine the optimal dimensions of the island. A general rule of thumb is to maintain at least 36 inches of clearance around the island to allow for comfortable movement. The countertop height should also be considered. Standard countertop height is approximately 36 inches, but this can be adjusted to accommodate specific user needs or preferences. Counter-height seating, for instance, typically requires a countertop height of 42 inches, requiring stools around 30 inches high. In contrast, a lower table height requires a 30 inches countertop with chairs roughly 18 inches high.
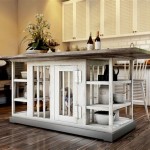
Once the basic dimensions and shape are established, focus on the internal structure and storage options. Cabinets, drawers, shelves, and open storage compartments can be incorporated into the design. Consider the placement of these features to maximize accessibility and usability. For example, drawers are ideal for storing utensils and smaller items, while cabinets are suitable for larger pots and pans. Open shelving can be used to display decorative items or frequently used kitchen tools.
Electrical and plumbing considerations are central to the design phase if the island will incorporate appliances or a sink. Consult with a licensed electrician and plumber to determine the necessary wiring and plumbing connections. Plan the routing of electrical wires and plumbing pipes to ensure they are safely concealed within the island structure. Remember to comply with all local building codes and regulations.
Finally, select the materials for the island. The choice of wood, countertop material, and hardware will significantly impact the overall aesthetic and durability of the island. Common wood choices include maple, oak, cherry, and walnut. Countertop options range from granite and quartz to laminate and butcher block. Consider the durability, maintenance requirements, and cost of each material before making a final decision. Selecting appropriate hardware, such as knobs, pulls, and hinges, can add a finishing touch and enhance the functionality of the island.
Key Point 2: Constructing the Island Frame and Cabinetry
The construction phase begins with building the island frame, which provides the structural support for the entire unit. Use high-quality lumber, such as kiln-dried pine or poplar, for the frame. Cut the lumber to the specified dimensions according to the detailed plans. Assemble the frame using screws, nails, and wood glue to ensure a strong and durable connection.
The frame’s construction typically involves building a base cabinet structure. This can be achieved by assembling individual cabinet boxes and connecting them to form a single unit. Alternatively, a more simplified approach involves building a basic box frame and attaching cabinet doors and drawer fronts to it. The method employed depends on the desired level of complexity and the available skill set.
Ensure the frame is level and plumb. Use shims to correct any imperfections in the floor. If the island will be fixed in place, secure it to the floor using screws or bolts. Alternatively, if a mobile island is desired, attach heavy-duty casters to the base of the frame.
Next, construct the cabinets and drawers according to the detailed plans. Use plywood or medium-density fiberboard (MDF) for the cabinet boxes and solid wood for the drawer fronts and doors. Assemble the cabinet boxes using screws, nails, and wood glue. Install drawer slides to ensure smooth and effortless drawer operation. Attach cabinet doors with hinges, ensuring they are properly aligned and swing freely.
Pay close attention to the details of the cabinetry. Ensure all edges are smooth and free of splinters. Sand the surfaces thoroughly before applying a finish. Apply a primer and several coats of paint or stain to protect the wood and enhance its appearance. Consider adding decorative trim or molding to the cabinets to add a touch of elegance.
Key Point 3: Installing the Countertop and Finishing Touches
Once the frame and cabinetry are complete, it is time to install the countertop. The installation process will vary depending on the type of countertop material chosen. For granite or quartz countertops, it is recommended to hire a professional fabricator and installer. These materials are heavy and require specialized tools and expertise to handle and install correctly.
For laminate or butcher block countertops, the installation process is more straightforward. Cut the countertop to the required dimensions using a circular saw or jigsaw. Attach the countertop to the frame using screws or construction adhesive. Ensure the countertop is level and securely fastened to the frame.
With the countertop in place, proceed with the finishing touches. Install any appliances, such as a sink, cooktop, or microwave, according to the manufacturer's instructions. Connect the plumbing and electrical wiring, ensuring all connections are secure and comply with local building codes. Install the hardware, such as knobs, pulls, and hinges, to complete the cabinetry.
Add any decorative elements, such as backsplashes or decorative panels, to enhance the aesthetic appeal of the island. Seal the edges of the countertop with caulk to prevent water damage. Clean the entire island thoroughly and inspect it for any imperfections.
Consider adding electrical outlets and USB charging ports to the island to provide convenient power access for small appliances and electronic devices. Install task lighting underneath the countertop to illuminate the work surface. Consider adding accent lighting to highlight the island's features and create a warm and inviting ambiance.
Incorporating seating around the kitchen island can transform it into a social hub. Choose comfortable and stylish stools or chairs that complement the overall kitchen design. Ensure the seating is properly positioned to allow for comfortable legroom and easy access to the countertop.
Finally, personalize the kitchen island with accessories and décor that reflect individual style and preferences. Display cookbooks, plants, or decorative items on open shelves. Use the island as a serving station for parties and gatherings. With careful planning and execution, a well-designed and constructed kitchen island can significantly enhance the functionality and aesthetic appeal of a kitchen.
Throughout the entire building process, safety precautions are paramount. Wear appropriate safety gear, such as safety glasses, gloves, and a dust mask. Use power tools safely and follow the manufacturer's instructions. Work in a well-ventilated area. If unfamiliar with any aspect of the construction process, seek professional assistance. Building a kitchen island is a rewarding project that can add value and enjoyment to a home.

Build A Kitchen Island

Build A Diy Kitchen Island Basic
:max_bytes(150000):strip_icc()/designs-by-studio-c-free-kitchen-island-plans-584ae54d5f9b58a8cd492153.jpg?strip=all "18 Great Diy Plans For Kitchen Islands")
18 Great Diy Plans For Kitchen Islands

How To Build A Diy Kitchen Island House By The Bay Design
:max_bytes(150000):strip_icc()/KISLAND51-5a81bc963037130036439389.jpg?strip=all "18 Great Diy Plans For Kitchen Islands")
18 Great Diy Plans For Kitchen Islands

Best Free Kitchen Island Building Plans Build Basic

How To Build A Diy Kitchen Island

Kitchen Island Dimensions Essential Size Spacing Guide January 2025

Build A Diy Kitchen Island Basic

Kitchen Layout Ideas For An Ideal Roomsketcher