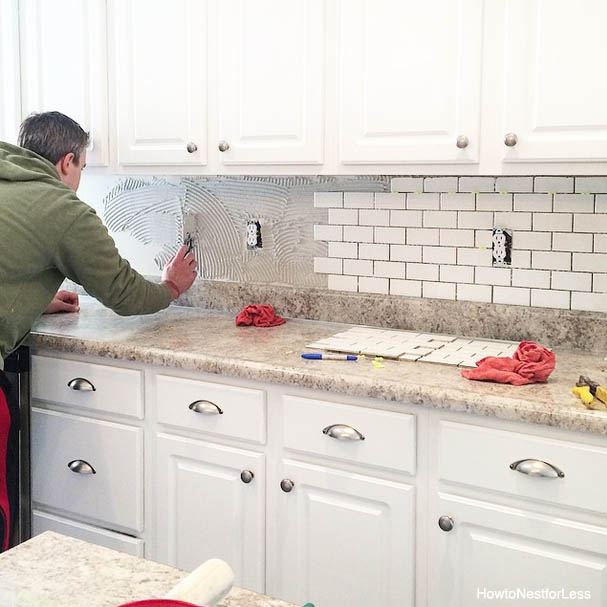
How To Install A Tile Backsplash In The Kitchen
Installing a tile backsplash in the kitchen is a popular home improvement project that can significantly enhance the aesthetic appeal and functionality of the space. A well-installed backsplash protects the wall from water damage and spills, simplifies cleaning, and adds a personal touch to the kitchen's overall design. This article provides a comprehensive guide on how to install a tile backsplash, covering the necessary tools, materials, preparation steps, tiling techniques, and finishing touches.
Gathering Tools and Materials
Before embarking on the tile installation process, it is crucial to assemble all the necessary tools and materials. This proactive approach will ensure a smooth and efficient workflow and minimize interruptions during the project.
Essential tools include:
*Tile saw: A wet saw is essential for cutting tiles accurately, especially for intricate shapes and sizes. A snap cutter can be used for simpler, straight cuts, but a wet saw provides greater precision.
*Notched trowel: This tool is used to apply the thin-set mortar evenly onto the wall.
*Grout float: The grout float smoothly applies grout into the tile joints.
*Grout sponge: Used for cleaning excess grout from the tile surface.
*Level: Ensures that the tiles are installed straight and uniformly.
*Measuring tape: Provides accurate measurements for tile layout and cuts.
*Pencil: Used for marking cutting lines and reference points.
*Buckets: Needed for mixing mortar and cleaning sponges.
*Safety glasses and gloves: Protects eyes and hands during the installation process.
*Caulk gun: Applies caulk to seal edges and corners.
*Utility knife: Useful for trimming plastic sheeting and other materials.
*Painter’s tape: To protect countertops and cabinets.
Necessary materials include:
*Tiles: Select the desired tile type, size, and quantity, accounting for waste from cuts and potential breakage.
*Thin-set mortar: This adhesive binds the tiles to the wall. Choose a mortar suitable for the type of tile being used.
*Grout: Fills the spaces between the tiles. Select a color that complements the tiles and kitchen design.
*Caulk: Used to seal edges and corners, preventing water damage.
*Sealant: Protects the grout from stains and water damage.
*Plastic sheeting: Protects countertops and flooring from mortar and grout.
*Backer board (if necessary): Provides a stable substrate for tiling, especially in areas prone to moisture.
Preparing the Surface
Proper surface preparation is critical for ensuring a strong and durable tile backsplash. A clean, level, and stable surface will promote optimal adhesion of the tiles and prevent future issues such as cracking or detachment.
The first step is to thoroughly clean the existing wall surface. Remove any grease, dirt, or debris with a degreaser and a sponge. Rinse the surface with clean water and allow it to dry completely. If there is old tile present, it must be carefully removed. Using a chisel and hammer, gently tap the old tiles to loosen them, being careful not to damage the underlying wallboard.
Inspect the wall for any imperfections, such as holes, cracks, or unevenness. Fill small holes and cracks with patching compound and allow it to dry according to the manufacturer's instructions. For larger imperfections, the installation of a backer board may be necessary. Backer board, such as cement board, provides a stable and moisture-resistant substrate for tiling. Cut the backer board to size using a utility knife and score-and-snap method. Attach the backer board to the wall studs using screws, ensuring that it is flush with the surrounding wall surface.
Before applying the thin-set mortar, apply painter’s tape to the countertops and cabinets adjacent to the backsplash area. This will protect these surfaces from accidental splatters and make cleanup easier.
Establish a level starting line. Use a level to draw a horizontal line along the wall where the bottom row of tiles will be placed. This line will serve as a guide for ensuring that the tiles are installed straight and uniformly. If the countertop is not perfectly level, use the countertop as a reference and adjust the starting line accordingly.
Installing the Tiles
The actual tile installation process requires patience and attention to detail. Careful application of the thin-set mortar and precise placement of the tiles are essential for achieving a professional-looking backsplash.
Begin by mixing the thin-set mortar according to the manufacturer's instructions. Use a clean bucket and a mixing drill to create a smooth, consistent mixture. Avoid adding too much water, as this can weaken the mortar’s adhesive properties.
Apply the thin-set mortar to the wall using the notched trowel. Hold the trowel at a 45-degree angle and spread the mortar evenly over a small area, typically about 2-3 square feet. The notched design of the trowel creates ridges in the mortar, which help to ensure proper adhesion of the tiles. Do not apply mortar to a large area at once, as it can dry out before the tiles are placed.
Place the first row of tiles along the level starting line. Press each tile firmly into the mortar, ensuring that it is flush with the adjacent tiles and that the grout lines are consistent. Use tile spacers to maintain uniform spacing between the tiles. This will create a clean and professional look and will allow for proper grout application later.
Continue installing the tiles, working from the bottom up and from one side to the other. Use the level frequently to check that the tiles are remaining straight and uniformly spaced. Make any necessary adjustments as you go to ensure that the tiles are properly aligned.
When you reach corners or edges, you will likely need to cut the tiles to fit. Use the tile saw to make precise cuts, following the measurements that you have taken. Wear safety glasses when using the tile saw to protect your eyes from debris. For small cuts or complex shapes, a tile nipper can be used.
Once all the tiles are installed, allow the thin-set mortar to dry completely according to the manufacturer's instructions. This typically takes 24-48 hours. Do not disturb the tiles during this time, as this can affect their adhesion and stability.
Grouting and Sealing
After the thin-set mortar has fully cured, the next step is to apply the grout. Grouting fills the spaces between the tiles, creating a waterproof seal and enhancing the overall appearance of the backsplash.
Remove the tile spacers from between the tiles. Mix the grout according to the manufacturer's instructions. Use a clean bucket and a mixing drill to create a smooth, consistent mixture. Avoid adding too much water, as this can weaken the grout and cause it to crack.
Apply the grout to the tile surface using the grout float. Hold the float at a 45-degree angle and spread the grout diagonally across the tiles, forcing it into the grout lines. Work in small sections, ensuring that all the grout lines are completely filled.
Once the grout lines are filled, remove the excess grout from the tile surface using the grout sponge. Dip the sponge in clean water and wring it out thoroughly. Wipe the tile surface diagonally across the grout lines, removing the excess grout and smoothing the joints. Rinse the sponge frequently to prevent it from becoming saturated with grout.
Allow the grout to cure according to the manufacturer's instructions. This typically takes 24-48 hours. During this time, periodically wipe the tile surface with a clean, damp sponge to remove any grout haze that may appear.
After the grout has fully cured, apply a sealant to protect it from stains and water damage. Use a grout sealant applicator or a small brush to apply the sealant to the grout lines. Allow the sealant to dry according to the manufacturer's instructions.
Caulking and Final Touches
The final step in the tile backsplash installation process is to apply caulk to the edges and corners of the backsplash. Caulking creates a waterproof seal and prevents water from seeping behind the tiles.
Apply a bead of caulk along the edges of the backsplash, where it meets the countertop, cabinets, and walls. Use a caulk gun to apply the caulk evenly and smoothly. Smooth the caulk bead with a wet finger or a caulk smoothing tool to create a clean and professional finish.
Allow the caulk to dry according to the manufacturer's instructions. This typically takes 24 hours. Once the caulk is dry, clean the tile surface with a mild detergent and water. Remove any remaining debris or residue.
Inspect the backsplash for any imperfections, such as loose tiles or damaged grout. Make any necessary repairs to ensure that the backsplash is structurally sound and aesthetically pleasing.
Lastly, remove the painter’s tape from the countertops and cabinets. Enjoy the newly installed tile backsplash.

How To Install A Kitchen Backsplash The Best And Easiest Tutorial

How To Install A Tile Backsplash Part 1 Buildipedia Diy

How To Install A Perfect Tile Backsplash All Materials Tools And Prices Included

How To Install A Tile Backsplash Arizona

How To Install A Kitchen Backsplash The Best And Easiest Tutorial

How To Install A Perfect Tile Backsplash All Materials Tools And Prices Included Youtube

How To Install Subway Tile Installing Backsplash For The First Time Crafted Workshop

How To Install A Pencil Tile Backsplash And What It Costs The Kim Six Fix

How To Install Tile Backsplash Fixthisbuildthat

How To Install A Tile Backsplash The Home Youtube
See Also


