Kitchen Bump Out Before And After
A kitchen bump out is a great way to add extra space to your kitchen without having to do a major remodel. It can be a great way to add a breakfast nook, a pantry, or even a home office. If you're thinking about doing a kitchen bump out, here's what you need to know.
### Before You StartBefore you start planning your kitchen bump out, there are a few things you need to do.
1.Check your local building codes.
Make sure that a kitchen bump out is allowed in your area. You may need to get a permit from the city or county. 2.Hire a contractor.
A qualified contractor can help you design and build your kitchen bump out. They can also help you get the necessary permits. 3.Set a budget.
How much you spend on your kitchen bump out will depend on the size and complexity of the project. Get quotes from several contractors before making a decision. ### Planning Your Kitchen Bump OutOnce you've taken care of the preliminaries, it's time to start planning your kitchen bump out.
1.Decide what you want to use the space for.
Do you want a breakfast nook, a pantry, or a home office? Once you know what you want to use the space for, you can start designing it. 2.Choose a location for your kitchen bump out.
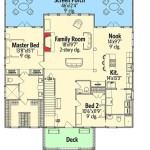
The location of your kitchen bump out will depend on the size and shape of your kitchen. You'll also need to make sure that there's enough space for a door or window. 3.Design your kitchen bump out.
The design of your kitchen bump out will depend on your personal preferences. You can choose to add a bay window, a cathedral ceiling, or even a fireplace. ### Building Your Kitchen Bump OutOnce you've finalized your plans, it's time to start building your kitchen bump out.
1.Excavate the foundation.
The first step is to excavate the foundation for your kitchen bump out. The size of the excavation will depend on the size of your bump out. 2.Pour the foundation.
Once the excavation is complete, you can pour the foundation. The foundation should be made of concrete and should be at least 12 inches thick. 3.Frame the walls.
The next step is to frame the walls of your kitchen bump out. The walls should be made of 2x4 studs and should be spaced 16 inches apart. 4.Install the roof.
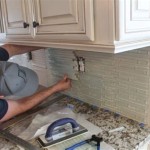
Once the walls are framed, you can install the roof. The roof can be made of shingles, metal, or tile. 5.Finish the interior.
The final step is to finish the interior of your kitchen bump out. This includes installing drywall, painting, and adding flooring. ### Enjoy Your New Kitchen Bump OutOnce your kitchen bump out is complete, you can enjoy your new space. Whether you use it for a breakfast nook, a pantry, or a home office, your kitchen bump out will be a great addition to your home.
6 Fabulous Ideas On Kitchen Bump Out Before And After 2024 Tools For Bathroom
Gabor Design Build Before And After Gallery Wisconsin S Leading Home Remodeler Since 2000
The Kitchen Before And Afters Chris Loves Julia
Gabor Design Build Before And After Gallery Wisconsin S Leading Home Remodeler Since 2000
Gabor Design Build Before And After Gallery Wisconsin S Leading Home Remodeler Since 2000
Farmhouse Inspired Kitchen Small Home Makeover Before After Demo Wall Bump Out Addition Youtube
Kitchen Bump Out Before And After
6 Fabulous Ideas On Kitchen Bump Out Before And After 2024 Tools For Bathroom
4 Unique Kitchen Bump Out Ideas
Bump Out Home Addition Ottawa Magnolia Construction